Showing posts with label nerd identity. Show all posts

Guest Post: Making Hawkgirl's Wings, Part 1

We are almost done with our series on the making of Steampunk Hawkgirl. Only a couple pieces of the costume remain in the proverbial un-posted-upon dark, but there's a good reason for the wait: I wanted you guys to have the most comprehensive explanation for how the 'bones' of the wings came together, as they were the most challenging part of this project. 

The 'bones' themselves were the result of two phases of construction, the first of which took place not in my little nerdy abode, but, rather, all the way out on the West Coast. My extremely talented cousin and fellow cosplayer, Mel, and her friend, James, generously lent their skills during the early parts of the build. Mel is joining us today to describe how she and James turned some strips of metal into the foundation for Hawkgirl's wings. So, without further ado, here's Mel! 


Hi Nerds! I’m Mel and am here to share my contribution to Kel’s amazing Hawkgirl cosplay with you.

I love cosplay. The pride of figuring out how to make something new and the joy of participating in my favorite fandoms is such a rewarding experience and just plain fun. For me, cosplay is at its best when it becomes a team effort. I am lucky to have fellow makers in my life that will go down the costume rabbit hole with me simply to figure out if we can pull it off. Every costume we do usually presents us with a new skill to master and we try to help each other achieve a level of craftsmanship we couldn’t approach on our own. It also keeps things fun when faced with the more frustrating and tedious tasks that costume making comes with. Enter Kel’s latest adventure: Steampunk Hawkgirl!

Kel called me up to debate her construction options and I jumped at the chance to pitch in. First, Steampunk Hawkgirl is just awesome, especially when part of a group Steampunk Justice League cosplay. Second, the particular conundrum of articulating wing construction is something I couldn’t resist. One of my cosplay partners in crime, James, has always loved the idea of making articulating wings, and I just wanted an excuse to run around the house pretending I could fly. Kel had done a ton of research, which you can read all about in her previous post, and was debating which material to use: PVC pipe, wood or aluminum. All three would work, but they each came with challenges. Ultimately, we agreed that aluminum was the best route as it would be lightweight, durable, easy to operate, and aesthetically complimented her desired wing shape. The problem was that Kel lacked workspace and the necessary tools to get these done. 

Having done some aluminum work with James on a pair of holster buckles for a Rule 63 Han Solo costume I'd put together for SDCC 2014, I decided to volunteer our assistance. James has completed a great deal of metal work out of his garage over the years so he could save Kel the cost of acquiring tools as well as the headaches associated with the trial and error of learning how to work with the material. As Kel and I live on opposite coasts, we agreed that she would send me her design details and James and I would make the structural components of the wings for her.

Kel’s design was great! She had not only researched and developed a working mechanism for the wings but she built a full-scale mock up out of cardboard to test operation, shape and size. I completely agree with Kel’s advice to do a small and full-scale test of complex cosplay elements out of cheap material that you can work with quickly. This is the stage where you can really refine the design and anticipate any major problems before you put your time and hard-earned cash into the real deal.

Kel passed along photos and the dimensions of her wings, which I used to draw a set of templates using Adobe Illustrator. James and I made our own cardboard mock-up so we could understand exactly what we were doing and what Kel needed.

James did some material tests and determined that we could slim down a number of components so save weight. If we were doing this out of wood the original size and shape of Kel’s design would have been perfect, but aluminum is much stronger so you don’t need the extra material. Since one of Kel’s goals was to keep the wings under 7 pounds, we trimmed wherever we could. After a thorough evaluation, we determined that we could slim down all but the largest piece (the large curved bone at the top of each wing), which gives the wing its awesome shape when extended.

We headed to our local hardware & metal store for materials. Here is what we picked up:

Aluminum Bars: 1” wide x ¼” thick x 96” long (2.54 x 0.64 x 243.84 cm)
Aluminum Strips: 3” wide x 1/8” thick x 6’ long (7.62 x 0.34 x 15.24 cm)
Du-BroDura-Collars: 1/8” plated brass #597
Jig Saw Blades for metal work

Back at the garage we pulled out the following tools:

Jig Saw
Angle Grinder
Clamps
Safety Glasses
Work Gloves
Drill
Pop Rivet Gun w/ Rivets
Scrap Aluminum Rod to fit the Dura-Collars

After tracing our template pieces onto the aluminum with a Sharpie, James began clamping the aluminum to a worktable and cutting the straight pieces with a jig saw fitted with blades specifically for cutting metal. (General reminder: make sure you wear eye protection! The last thing you want is a metal shard in your eye. There are lots of awesome characters with eye patches, but I don’t think you want to cosplay them everyday.) James cut slowly and steadily to avoid dulling the blade too quickly, but you do want to change the blade often. Metal work will chew right through sharp blades in a surprising amount of time. Buy lots of them and don’t be afraid to toss them frequently. Blades are relatively inexpensive and cutting with a dull blade can ruin your aluminum edges, putting you at greater risk for injury.


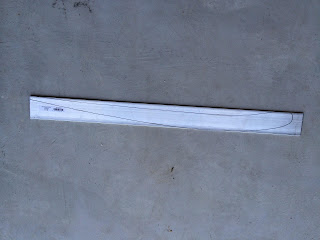
Next up, James cut the largest piece, which has a very distinct curved shape. For this he popped in a fresh blade and cut the piece out staying a little bit out from the marker line. This gave him some room to maneuver if he had a hard time going around a tighter curve or accidentally went off track a bit. Mistakes can happen when you are free-handing this stuff, so give yourself some room to course correct.


While James cut I began using the angle grinder on the rough-cut pieces. First, I rounded the corners of the straight bar pieces with the angle grinder and made sure there were no sharp edges. Doing this makes the pieces safer to handle and decreases the odds of the corners getting caught on any costume materials when the wings open and close. Second, I used the grinder to shave off that extra bit of aluminum that James left around the curved piece. This got the edge right to the marker line, ensuring an accurate shape. I then used some metal hand files to remove any lingering sharp edges.


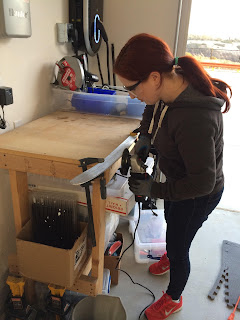
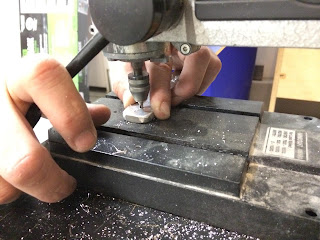
After all of that, I marked where we needed to drill holes for fasteners and James took care of them with his mini drill press (a hand drill would work just fine as well but, hey, if you have a drill press use it!).


James did some thesis-level research on fasteners. Seriously, I think he could give a full dissertation on how to fasten two moving parts now. This is important because you don’t want to throw a typical screw and a nut on there just to find out that they will unscrew themselves every time you deploy your wings! This is exactly what would happen, by the way. The motion of those two rotating pieces will twist your fastener with it resulting in, surprise, disassembly on the convention floor! 

James originally thought he could use nylon-coated screws, as they are known for being a good solution for this type of application, but they, too, failed us. After much googling he determined that a combination of pop rivets and collars would do the trick. We identified which joints would stay fastened forever, which got pop riveted, and then cut a short piece of aluminum rod that is long enough to connect the two aluminum pieces with a collar on each side. Make a little divot on the rod where you want the collar screw to stop and you now have a temporary fastener that allows you to remove them later with an allen wrench. The reason for this is so the wings can completely collapse for storage.

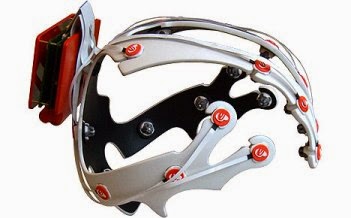
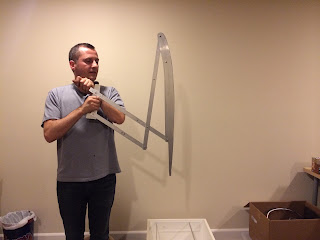
Ta-da! Giant wings! Right on Kel's weight target too: each assembled wing weighs 3 lbs. 2 oz.

After deploying them a number of times… for science… they got packaged up and made the journey to Kel. Because I was probably just as excited for Kel’s cosplay as she was I made sure I could personally present the wings to her on a most appropriate day, Christmas.


And there you have it. Since Kel did the heavy lifting by figuring out how the wings would work we only needed two afternoons in the garage to make them. This project is a classic example of how cosplay is a whole lot of planning and then relatively quick execution, so do your research and go make something great!
Read More

Book Review: CONfidence

It’s almost like the interwebs knew we were on a quest to feature more content outside of the realms of gaming. In the past few weeks we’ve gotten quite a few new original texts that we’ll be sharing with you. We got to glimpse into the dragons’ temple and now we transition to a very different, perhaps more familiar realm of life in a high school. 

For high school is where the bulk of the action takes place in CONfidence: the Diary of an Invisible Girl, the debut novel of Paige Lavoie of Pumpkin Spiced. This coming-of-age story has a distinctly nerdy bent, with the awkward, comics-loving protagonist Barbara (yes, named after Barbara Gordon) going on a journey of self-discovery as she’s introduced to the world of conventions by way of the machinations of her school’s AV club.

The club is populated with a handful of personable geeks led by Cassie, a recent transfer to the school after a long period of homeschooling. Cassie is the self-styled Queen of the Nerds and essentially the embodiment of all Barbara wishes she could be: confident, sociable, and resplendent with pastel hair that would make any denizen of Equestria go green with envy. Cassie’s force of personality and the creative talents of the other club members make up the backbone of a YouTube channel that they run under the guise of school approved club activities (while using school AV/drama club resources). Barbara is brought into their fold after her comic-inspired sketches catch Cassie’s attention and our heroine’s life is forever changed.

That which follows plays out like a teen movie. We get Barbara’s account of the proceedings via her entries into her diary, some of which morph into detailed first-person segments before eventually returning to journal entry format. She chronicles her bonding experiences with the group, particularly her deepening friendship with Cassie, as the group creates and produces episodes for their YouTube channel. It readily conjures feelings that many of us have experienced at least once before, realizing that you’re not alone in either the types of nerdy fandoms or the intensity with which you love these things. The exploration of those shared fandoms and, in Barbara’s case, new arenas in which to meet fellow fans is presented in a similarly nostalgia-inducing way. You’ll likely find yourself recalling your own first convention experience or the first time you donned cosplay. The text is also peppered with plenty of references that will make seasoned aficionados of various geeky properties break out into knowing grins.

All seems well for the members of the AV club at first, but it soon becomes apparent that initial appearances weren’t all of what they seemed. CONfidence breaks away from similar coming-of-age stories in its development of some of the characters and the layers of subject matter that are touched upon as a result. The majority of the individuals we’re introduced to are vibrant and complex, which is no small feat given that all we ‘see’ is filtered through Barbara’s gaze. In addition to the ‘a person may have crafted a careful façade to operate under, so be careful how you judge’ sentiments, there are quite a few nerd-specific social phenomena that are examined with impressive thoroughness and care. We explore the importance of having a fulfilling creative outlet, the unique and ever-changing role that social media plays in our lives, the revered but sometimes precarious atmosphere that a convention creates, how the definition of fandom is truly amorphous, and just how damaging it can be to condemn a fellow geek for not engaging with a nerdy property in a manner that we deem ‘correct’.

As mentioned earlier, at several points I felt like I was reading a film. This can be good; the narrative feels familiar while the prose is simple, super digestable, and allows you to plow on through it at speed if you so choose. However, the story arc does follow the movie-style trajectory and makes use of many classic tropes, so it can feel formulaic and potentially irk people who aren’t into that sort of thing.

CONfidence makes for a solid companion as you wait in line at a convention. It’s a fun, breezy bit of fiction that may conjure all sort of nostalgic feels and, as a potential added bonus, may inspire you to participate in NaNoWriMo (as CONfidence is the product of exactly that). If you’re planning on an excursion or two to the beach this upcoming summer, CONfidence may be an ideal book to bring along.


CONfidence will be available on Amazon beginning June 9th, but you can enter to win your own copy on Goodreads right now or follow other pre-release news via Paige's twitter.
Read More

Cosplay: Make Me Up

Hey, lately it seems like all the posts on here are all games, games, games. That's good and all, but what happened to the other stuff?

That's a very good question. There are two reasons why games have been dominating the Care and Feeding of Nerds as of late. Reason #1 is that it just so happened a bunch of game developers we've been working with had projects reaching the fundraising/publication phase all around the same time and we wanted to help make those efforts successful (related aside: there needs to be a fun term for a group of game developers, like a cadre of devs or a raiding party of devs). Reason #2 is decidedly less nice and has been mentioned a few times in the lead-ins of other posts. This winter, quite frankly, was a drawn out boss fight for the GIR and I. There were weeks of nightmare commutes, consecutive storms, and lots of damage to our home. Add to that the fact that I've been dealing with some decidedly unpleasant health stuff for the past five weeks or so. While we walked away victorious, the battle took up almost every minute of free time that wasn't otherwise spent at work or sleep. Consequently, all the crafty, bookish, cinematic, or culinary things got shunted aside in the face of relentless snow and projects with firm deadlines attached to them.

We're aiming to shine some light on those poor, neglected parts of the site ASAP beginning with this very post. As we get back to something akin to normalcy, production on Steampunk Hawkgirl is ramping up (less than 100 days remaining until Gen Con! Gah!). Between this and participating in the 30 Days of Cosplay Challenge over on our Instagram account, we've had a few cosplay-related questions come in, one of which was the following:

What makeup do you use when you cosplay and how do I get nice makeup without spending a ton of money?

I'll be perfectly honest here: were it not for cosplay, I would still be absolutely clueless about cosmetics. Growing up, makeup was enigmatic at best and, when the occasion called for its application, wearing it was something that was endured. My mother and other female relatives weren’t big on wearing it and the vast majority of my friends were either boys or girls whose stances on makeup mirrored my own.


All this cosmetic nonchalance came to a screeching halt when cosplay became my obsession hobby. The need to transform my own face and body into that of characters with sometimes very different features necessitated a certain level of familiarity with the products that would produce those results. Well, that and the fact that wearing a costume often translates to your picture being scattered into the wilds of the internets, which would prompt many people into wanting to put their best face forward, so to speak. 

I’ll present recommendations for each category of makeup in the order in which I normally apply them to my face (applying body makeup merits its own post). Each category will also include a few options representing a handful of price points for each type of cosmetic. Generally cosplayers fall into the “I’ll reuse as many of these products as I can outside the convention halls” or the “I don’t use these products for anything else” camps, so I wanted to provide options that will work for either mentality. Lastly, all the stuff I recommend here is either what I use personally or garnered high praise from fellow cosplayers/highly cosmetically literate friends.

Eye Shadow/Primer

I’m a big fan of doing all your eye painting before beginning work on any other part of your face. Not only do your eyes tend to take a long time to apply, but they can also smear/flake/otherwise ruin things like foundation if that application doesn’t go according to plan (or does, but your mascara feels like being uncooperative and snowing down ashy flakes onto your fresh foundation anyway).

Anyhow, the very first step of my eye painting process involves an application of primer (usually with my fingers). I was extremely skeptical of primer as a concept until Sephora got me hooked with a free sample of the stuff. Let me tell you, if your eye makeup plays a big role in your cosplay, you should definitely consider investing in a quality primer. Not only does the primer make all the colors in your shadows stand out, it ensures that those colors will last you the entire day without creasing, flaking, or wrinkling. It’s for this reason that I recommend Urban Decay’s Original Primer Potion. The Potion comes in a handful of varieties, but I tend to stick to the Original for cosplaying as it provides an excellent blank canvas for your shadows (the tinted versions of the Potion, like Sin, are really fun for everyday use, especially if you’re running short on time or just don’t feel like putting on shadow).

Speaking of shadows, this tends to be one place where you don’t have to fork over a ton of cash, especially if you’re not a person who uses their makeup in their non-convention life. Even if you are a regular cosmetics user, many of the colors you’d use for a costume don’t translate easily for wear beyond the dealer hall. Because of this, I tend to go with drug store eye shadows for any bold or especially bright colors, but invest a bit more in neutrals and hues that can pull double-duty.

My reigning favorite drug store eye shadows are from Revlon. Not only do their shadows stay put for extremely long periods of time (16+ hours), but they offer both individual colors and high utility sets. I’ve become a fan of their Photoready sets, as these always have at least two distinct, complete ‘looks’ within them (a ‘look’ here being primer, highlight, and accent shades). For one-off colors, the Revlon Colorstay Shadowlinks are solid shadows that apply easily and remain true to form all day long.

If you’re going to invest in a palette of shadows, I highly recommend picking up one of the Nakeds by Urban Decay (there are three versions of this line, some which suit particular eye colors better than others) or, if you’re really up to splurge, one of the core sets from Dior.

Image by Urban Decay


Eye Liner

This is, by far, my least favorite cosmetic item and I avoid applying it unless it’s absolutely necessary. However, if you need to reshape/define your eyes at all for your costume or if you’re planning on wearing false lashes then eye liner needs to come into play.

Given that, I tend to buy drug store brands, specifically Revlon, any time that an outfit calls for a liner that isn’t black. Revlon’s Colorstay line not only has a wide range of hues that will last you all day without a problem, but the liners are available in pencil, liquid, and gel form (if you have a strong preference on your liner format).

Black liner, on the other hand, is so versatile that it tends to be worth investing in (especially if you wear false lashes frequently). If you’re up for a splurge, the Diorshow Art Pen is not only long super long-lasting, but applies easily and meshes well with nearly all brands of false lashes.

False Lashes/Mascara

Speaking of false lashes, they may have a learning curve associated with them, but there’s really no duplicating the effect they give (the application process may get its own post). There are approximately a bajillion brands of lashes out there, so selecting a pair may induce a bit of analysis paralysis. 

Basically you're looking for lashes that give you your desired shape (i.e. angled for cat eyes, very wide for anime characters, etc) in at least a semi-realistically looking way. One way to ensure this is to look to see if the tips of the falsies cut off abruptly or taper to a point (like real eyelashes do). There's much ado about lashes made with real vs fake hair bristles, but there are plenty of quality brands made with each type. Just because a set of lashes is made with synthetic hair doesn't mean that they're of poor quality, particularly if you only wear them for conventions and don't need them to look hyper realistic.
Image by Kiss Lashes

I've become a big fan of Kiss brand lashes, as they're extremely easy to apply and come in a huge variety of styles. If you wear falsies very frequently (more than a few times a month) or are just up for a splurge you may want to look into a pair of Velour lashes.

When dealing with your own lashes, however, you generally want to add color and volume. I often layer mascara on (beginning with colored products and ending with dark brown or black), especially if I'm not wearing fake lashes. To get the look of fake lashes without actually using them, I start with Diorshow Lash Maximizing Plumping Serum on just the tips of my lashes. This stuff acts like a primer while also adding length to your lashes. Depending on the look I'm going for, I'll either use Almay's Intense i-color or Maybelline's Lash Sensational mascaras. If I need to be especially fancy or dramatic, then Diorshow Extase will get to take center stage.

Foundation/Concealer

Foundation is one of those products that definitely lives up to nearly all interpretations of its name. Since it's what holds the majority of your look together, it's worth taking the time to experiment and figure out what types of foundations/concealers work for your skin type. Regardless of whether you end up using my recommendations here or if you find something else that works brilliantly, there are two basic qualities that you're looking for in a convention-ready foundation: something that gives a matte finish and a product that does not contain any sunscreen. Why? It all comes down to how you'll look in pictures. Foundations with a shiny/dewy finish or that contain sunscreen will reflect light, leaving you washed out and featureless in any pictures where a flash was used.

For drug store foundations/concealers, there's really no match for Loreal's True Match. The product line is not only widely available, but it comes in a mind-blowing array of shades so you're almost guaranteed to find the perfect compliment for your skin tone. Loreal offers both liquid and powder versions of their True Match foundations/concealers. They are long-lasting and can easily pull double duty as your base makeup outside of the dealer hall.


Bare Minerals is an excellent choice if you have oily or very sensitive skin. Their foundations and concealers may take a bit longer to apply than most liquid products, but they tend to stay in place, never oxidize, and don't migrate into any creases you may have. The only downside with Bare Minerals is that it's tough to find a version without sunscreen (but it is possible and well worth the effort!). 

Dior Airflash is my absolute favorite foundation. It never oxidizes, applies very quickly, layers beautifully, and requires no retouching regardless of what you put it through during the day. The downside is that it is on the pricey side (and if you are considering buying this, you should give thought to also purchasing the application brush). However, if you do decide to bring Airflash home it will last you at least a year, as you use only a tiny amount with each use. 

Blush/Bronzer/Highlighter  

Bare Minerals is my go-to brand for bronzer or highlighter. They produce a wide variety of colors that all look extremely natural, but can be easily layered to provide dramatic effects as needed. It's also very gentle on your skin and can be used with just about any brushes.

My last recommendation isn't technically a cosmetic, but may end up as a staple in your makeup bag. Model in a Bottle setting spray is practically sorcery. Spray it gently over your finished look and it will lock everything in place for the rest of the day. Bonus: it will ensure that you have a matte finish on all of your makeup which, as we talked about in the Foundation section, is critical to making sure your hard work translates well into a camera.

Hope you guys found this helpful! Feel free to let me know if you have any questions.
Read More

Party On! It's Our Birthday!

It's absolutely insane to me that it's been three years since a burst of post-PAX productivity resulted in the Care and Feeding of Nerds. Even crazier is just what's happened in the three years since that day. Just in the time since this same point last year we've reviewed nearly 30 video games, finished 4 costumes, made 6 different types of noms, and got to have a hand in 4 crowdfunding campaigns. Add to all that a few movie recaps, our annual game-a-thon to raise money for sick kids, some new crafts, new books, and plenty of board games and it'd be a pretty busy go of things.

But that was only the beginning of what we got to see unfold in the past year.


This year we partnered with the Game Makers Guild, covered three conventions and spoke on our first panel! On top of all that, some of the biggest changes stemmed from our transition from a one-person blog to a full-fledged website. There are now three of us creating content in this corner of the internets, plus help from the occasional guest author. We have a beautiful interface courtesy of the talented KayLuxeDesign and our own domain. Happily, all those efforts seem to be paying off (or at least give me an excuse to make graphs!).


The best part about all of this has been getting to watch the community that's sprung up around this site change and grow. Last year I was thrilled to see that 100 people followed us on Twitter and 600 did the same on Pinterest. As of the time of writing, we have over 600 Twitter followers and more than 1,400 fellow nerds digging our pins on Pinterest. We've also grown over on our Facebook page to nearly 100 likes and we've really enjoyed expanding into both Instagram and Steam. I say it every year, but it definitely still holds true: watching this growth is a profoundly humbling thing.

We've gotten to meet so many new people and reaffirm connections with veteran readers. It's been an absolute privilege to work with you as you design your games, make your costumes, or just saying hi on one of our social media pages. You guys are the best and, because you deserve the best, we'll continue to give you the highest quality content in the days to come.

Here's to turning 3 and to many more happy years ahead! Happy birthday Care and Feeding of Nerds!


Read More

Gias Glance: Sending the Gaming Industry a Message (Part 3)


This post is the third in a series examining why gamers should reconsider pre-ordering games. If you're just joining us now, you can find the first part in the series here, and the second part here.


Why Not Pre-Order? For a Better Video Game Industry

Please oh please let VR be a huge gaming success.
I have wanted in-home gaming VR since I was a kid.
If you're a fan of video games, then presumably you would like the video game industry to continue existing for decades to come so that you can continue to play games as you get older. Presumably you would also want there to be innovation and progress in the industry in order for better, more exciting games to come out in the future.

Looking back at the history of gaming tells us a lot about what we can expect in the future, just as any historical background can help inform us about where we’re going. For example, look at how the graphics of games have changed from the 80s to today. The leap is so profound and amazing that if you tried to explain it or show it to a gamer from that era, they might have a difficult time grasping how it’s possible. The content of games has also changed rather dramatically. In the 80s, the available hardware did not have the processing power to simulate large open worlds for exploration, or for there to be hundreds of things going on at one time in one place. We can expect these trends to continue, though perhaps not to the same startling degree, but improvements in these areas are logical steps forward.


However, with all the hope that those amazing changes give us, there are some disturbing things from gaming history that we must consider as well. It is possible for the market to reach a point where consumers lose so much faith in developers that the market crashes. It's happened before. There was a North American video game crash in 1983 followed by a recession that almost destroyed the video game industry altogether. The most widely accepted cause for this crash was market saturation of poorly made games, such as the legendarily bad E.T. the Extra-Terrestrial video game. The gaming industry got to a point where developers were comfortable pushing out games in a terrible and/or unfinished state. Customers became fed-up and stopped buying the products in large enough numbers that the industry collapsed. Following this collapse, companies sought to avoid the mistakes that lead to the disaster and began making higher quality games.


The state of the gaming industry today is such that I wouldn't be surprised if there was another crash. Companies have grown complacent and find it acceptable to push unfinished games out the door. They promise patches to fix the issues, though much of the time many bugs are left unfixed. Companies do this because there is a time value to money: if you can earn $100M today instead of in 3 months, the money today is worth more since the value will appreciate over time. Developers could easily hold back games until they are polished and in a good and playable state, but don’t because they know that people will buy them anyway. They understand that the market will bear the buggy nature of their games.

Final Note

Change IS going to come to the video game industry, one way or another, and what that change is depends on how consumers choose to spend money. If we continue the trend of handing over money every time a developer makes a new game, regardless of the quality, then the game industry will wither. Giving money to developers without care for the entertainment value of a game tells them they don’t need to spend money or effort on their games. I want a game industry that puts out well polished, innovative, entertaining games. If you want that sort of game industry as well, please show the game developers by voting with your wallet.

We are also on the verge of thought controlled games.
I can't wait to see the future of gaming if companies
and consumers can get their acts together.

Read More

Gias Glance: Sending the Gaming Industry a Message (Part 1)


We have asked and answered “Why Pre-Order?” but it’s also important to ask “Why Not Pre-Order?” This article will be the first in a series of posts that will attempt to answer the question “Why Not Pre-Order?”


In my previous three-part series, I addressed the most common reasons why people pre-order games and why each reason either does or does not have merit. In this installment, I’ll be giving you the reasons that have turned me off of pre-ordering games. Additionally, I’ll also be addressing ad business practices within the video game industry in general, since the two issues are so closely related. As with the previous series, I’d like to make it clear that I’m not saying “people are not allowed to pre-order games.” I’m stating that it’s a bad idea to pre-order games most of the time. I’m not telling people what to do with their money. You're capable of exercising rational judgement: use your money wisely, or don’t, it’s your choice.


[Please note: these articles are not meant to address pre-ordering with regards to Nintendo games. I consider pre-ordering Nintendo games a separate topic and discussion for another time since Nintento's business practices are so very different from that of the rest of the industry. These articles are aimed at non-Nintendo video game developers.]
Why Not Pre-Order?  Bad Games

There’s one main reason why gamers play games: entertainment. We want to enjoy ourselves and not be bored. We spend so much money and many hours on this passion of ours. It’s the same reason why people watch TV, watch movies, read books, and listen to 

music. We do all of this because we enjoy it. However, not every game is going to be entertaining, just as not every movie, book, TV show, or song is going to be compelling. Sometimes in the medium that we enjoy, there are entries which are poorly created. Those items can end up being lackluster.

When purchasing a game, how is a gamer to know if they are going to enjoy their experience? As with pretty much every other item available for purchase, this can be accomplished by reading reviews prior to purchasing the item. Game reviewers often are able to give us first impressions before a game releases. Impressions from beta testers and people who demoed that game at a convention can also help form early impressions of the game without having consumer feedback. What would you say about a person who purchased a brand-new car without having researched how well the car was made or designed? There are many readily available free resources for 

discovering the quality and reception of items for purchase before purchasing them. A consumer just needs to wait for a product to be released in order to discover the product’s quality without risking their own money. Reviews are typically released at least the same day as the item, or, on occasion, several days before release of the item.

Information is the most powerful tool for consumers. It informs us as to the value and quality of potential purchases. It can save us from wasting money that could have otherwise been spent on a 

better product. If every single purchaser of Sim City 2013 knew ahead of time that the game would be literally unplayable for weeks after release (editor's note: read here to find out why) then very few, if any, people would have purchased the game at release. They would have at least waited until it was playable. The only way to discover information like that, as to whether a game is playable, is to either wait for reviews (just a single day after release) or to buy the game themselves. Why spend $60 to get the information when it can be obtained for free? 

Remember the reception of Superman 64? It was one of the worst games ever made. I have never heard a person speak positively about it, nor any fanaticism defending the game. If you were the type of person to blindly pre-order a game without waiting for review information on its quality, you risk getting a game like Superman 64: a horrible un-fun experience that is nothing more than a waste of money. If you care about spending your money on fun experiences that entertain you, then what reason could you have for not doing your research first? Would you research a car? Would you research a computer? Then why not research a game?


Read More

Critical Convention Mass Redux

Whew! It’s been a very interesting few days. In the past week we’ve been blanketed with over 4.5 feet (apx. 1.37 meters) of snow and the rest of the past two business weeks have been a cavalcade of snow-related hijinks. Amidst all the storminess, the true point of high drama wasn’t the blizzard but, rather, was what has become the annual spike in blood pressure otherwise known as housing registration for Gen Con.

To the outside observer, that last sentence may seem hyperbolic, but if you’ve ever been a participant in the process you know just how nerve-wracking it can be. This year was certainly no exception in that respect. After the chaos that characterized last year’s registration, Gen Con announced that it would be implementing a handful of changes to the registration process in the hopes of addressing some of the biggest sources of frustration from 2014. Arguably the most controversial of these changes was the addition of a lottery system that would randomize attendee access to the housing portal.

In all previous years, using the housing portal was pretty much the textbook definition of a free-for-all. You signed on as close to noon EST as humanly possible and prayed that the server gods would smile on your quest for affordable convention housing. Until recently (let's call 'recently' the past two or so convention years) that roughshod procedure functioned with a reasonable degree of satisfaction for those congoers in need of a place to sleep while in Indy. However, it's no secret that this level of success was only possible because demand in past years was nowhere close to the level it's at now.

As we discussed in detail in this post concerning Gen Con housing last year, the number of Gen Con attendees has been increasing at an exponential rate each year for the past five convention years. In that spirit, I've updated the chart featured in last year's post to include attendance data from Gen Con 2014. The result looks like this:
All attendance data comes directly from Gen Con LLC
It's pretty much what we'd expect of exponential growth: a sharper, more pronounced slope as the line progresses towards the right-hand side. But, at this point, the story isn't the conventions already in the books; the real point of interest are the Gen Cons that will happen between now and 2020. We can treat 2020 as our break point because that is the last year of Gen Con's formal agreement with the Indianapolis Convention Center.[1] So what can we expect between now and then? 

Well, I tried to come up with a reasonable simulation by forecasting a rate of growth similar to what we've seen in the past few years. If we look at the past three convention years, the weighted average increase in attendance is 15.53% year over year. I would have gone back farther to get this measure, but 2011 was a monster year in terms of new congoers and using it skews the average quite a bit higher. I then computed two other averages: one based on the year-over-year percentage increases that Gen Con has reported to give us a lower boundary and the other using six years of raw data instead of three (thus including the high 2011 reading) to give us a reasonable high boundary. Using those averages to compute the number of additional attendees per annum, then projecting the results out over the next six conventions, produces attendance figures that look like this:

In each of these cases, attendance is slated to be more than double last year's final tally of 56,614 by the year 2020 and, in two of the three cases, we'd see doubling of the 2014 measure by 2019 or earlier. This projected increase would effectively mirror the trends in attendance during the past six years given that, “..since 2009, Gen Con’s Annual attendance has more than doubled.”[2] The preliminary information released by Gen Con indicated that this year’s registration was, “…the largest opening registration in Gen Con’s 48-year history,”[3] so it seems as though at least one of our forecasts is a reasonable estimate of the near future. If any of these cases actually come to pass, it would put Gen Con alongside both present-day New York and San Diego Comic Cons in terms of attendance.[4]

Even if none of the above transpires as described and Gen Con attendance enters into a period of relative stability akin to the years 1997-2008 we, as would-be congoers, would still be left with the reality that the Best Four Days in Gaming can only accommodate a percentage of us. The question then becomes, “Well who gets to go?” The immediate follow-up thereto has been uttered in equal parts benediction and curse, “What’s a fair way to determine that?”

This is where the new lottery system was supposed to come into play. Upon purchasing a badge, a would-be attendee was supposed to be assigned a random time. This time represented how long that badge holder would have to wait before being granted access to the housing portal and would also provide the administrators with a measure of control over the demands being placed on Gen Con servers, as the latter had been the source of numerous headaches in previous years.

Registration came and went. Before all was said and done the inventory of the housing portal was wholly depleted. There were those parties who came away pleased with the results, those that could accept the results, and those left gnashing their teeth in fury/disappointment. Gen Con attempted to address this, along with the handful of technical issues that sullied the process, but also conceded, “…rising demand for downtown housing is growing faster than the amount of available properties.”[5] This statement, along with a similar note posted to the con’s official Facebook page just before registration began, marked some of the first full organizational admissions that demand far outpaces supply. Even a flawless registration system would not deliver the experience that everyone who sought it was hoping and planning for and this problem will persist so long as more new people want to attend.

Which leaves us at the present. Fair access will be determined by whatever means Gen Con wishes to implement in a given year and, really, that's pretty much in line with what most other conventions of its size have already done. With demand at such incredibly high levels, no system will be able to accommodate all would-be congoers. PAX East said as much in its registration follow-up FAQ,"...no matter how you skin this, there will be about 75K people who aren't happy because they wanted a badge and were unable to purchase one. All another system would do is take badges from one person and give them to another." Given this, it's likely that Gen Con will default to whatever ends up being easiest to administrate and is most cost effective.

Growing pains definitely earn their moniker and it remains to be seen what the long-term effects of this dizzying expansion will be for Gen Con. What we do know is that the ability to count on rolling dice during the Best Four Days in Gaming is long gone. As mentioned last year, the Nerdaissance runs on with board games at the front of the proverbial pack. It is a beautiful, if bittersweet, phenomenon and it's unfortunately something that we have to learn to live with.


[1] Gen Con LLC. (ND). “Future Show Dates”. Accessed on 4 February 2015 at http://www.gencon.com/attend/futuredates
[2] Gen Con LLC. (2014). “Gen Con Attributes Record-Breaking 2014 Numbers to Growing Partnership Between Gamers and Indianapolis Community.” Accessed on 4 February 2015 at http://www.gencon.com/press/2014recordattendance
[3] Gen Con LLC. (2015). “Housing Registration Follow-Up.” Accessed via email on 29 January 2015.
[4] Hill, Kyle. (2014). “San Diego Comic-Con: By The Numbers.” Nerdist.com. Accessed on 4 February 2015 at http://www.nerdist.com/2014/07/san-diego-comic-con-by-the-numbers/.
[5] Gen Con LLC. (2015).
Read More

Cosplay: Put a Bow (and Laces) on it!

Hey guys, hope your holiday season is warm and filled with awesome thus far. Amidst the deluge of games, books, and goodies, there’s also been a bunch going on behind the scenes here at the Care and Feeding of Nerds. Some of these stealthy machinations have to remain secret for now, but other activities can definitely be shared. One of said activities is the measured, but ongoing progress towards the making of Steampunk Hawkgirl.

In just about any other year a costume for Gen Con would already have been benched in favor of whatever was going to be worn for PAX East. There are a few reasons why things will be a bit different in 2015: both of the above mentioned conventions are being held much earlier than would be considered typical (late July and early March, respectively), the stakes have been upped with Hawkgirl as she’ll be part of a group cosplay, and whether I’ll be able to cosplay at all during PAX East remains to be seen (I promise I’ll clarify this last point soon). Given all this, I’m planning on refurbishing one of my existing costumes for PAX if I do end up being able to cosplay during that con.

Without other costumes on the cosplay docket, I was able to tackle a project that I’d always wanted to take on: making a corset from scratch.

<>

Gonna be honest, for a very long time I regarded from-scratch corset making in the same way that I considered making deployable wings. It seemed like such an interesting project that was also fraught with complications and seemed all sorts of intimidating. While I wish I could say something like, “but it’s really not so scary. Anyone can do it!” that wouldn’t be accurate. What I can say is that making a corset is an involved process and, depending on what type of corset you make, can be quite difficult. However, difficult doesn’t at all translate to impossible. With solid preparation and careful execution, making your own custom corset is entirely achievable if you can sew in a straight line.

Before we get down to the nitty gritty of corseting, it would probably help to clarify what types of garments we’re talking about. If you haven’t already, you may want to read this post from a while back that talks about the differences between fashion ‘corsets’, bodices, and fully functional corsets. The construction techniques detailed below could be used to make a fashion corset or bodice by omitting the busk and/or replacing the bones with plastic stays, but I’m writing this tutorial for the express purpose of making a real, self-supporting corset that could be used for a number of functions, including waist training.

The reason I’m insisting on the corset being fully functional is that it’s going to serve as the foundation for the harness that will hold Hawkgirl’s wings. The corset ultimately needs to be able to support my dimensions, the weight of the harness, and the wings themselves. That being said, if you love the idea of a real corset, but are less than excited about the idea of making your own, there are a number of reputable corset dealers online that offer high quality garments or even custom pieces. If you end up purchasing a corset, a basic steel-boned garment will run between $75-$250 USD (custom pieces usually start around $250 USD).

Ok, now that we have the particulars set aside, let’s make a corset! First we have to decide which of the two main varieties of corset we’d like to make: underbust or overbust. These names describe where the neckline or top edge of the front of the corset will end. For this costume, I wanted an underbust corset since those seemed to be more prevalent in the Steampunk genre. Also, underbust corsets are generally a bit easier to put together than their overbust peers because you don’t have to build accommodations for your breasts. Fewer curves to sew = fewer headaches! (most of the time, anyway)

Once we know which type of corset we’ll be building it’s time to select or create a pattern. There’s a wealth of patterns out there on the interwebs, many of which can be downloaded for the low, low price of free. In my first go with corseting I drafted a pattern using these instructions, which are an excellent foundation for most underbust corsets. I loved the pattern and the resulting corset, but it quickly became clear that the garment, while definitely sturdy, would likely have a tough time supporting wings. After some additional googling, I came across the pattern you see below. The fuller, more encompassing design seemed like it stood a very good chance of being up to the wing-wielding task.

Corset attempt #1
The inspiration for the pattern I used for attempt #2 came via Alt-Noir
Regardless of the pattern you choose, the basic steps used to assemble a corset are the same. First, gather your materials. All fully functional corsets need the following:

Materials
Tools
A solid fabric for the outside of the corset
A Sewing Machine
Coutil, or another strong lining fabric
A Grommet Toolset
Boning, Boning Tips, and Busk
A Rotary Cutter & Mat
Waist Tape
Scissors
Grommets
Measuring Tape
Lacing
Small pliers (like those used for chainmail)

Using your measuring tape, take the measurements that your pattern calls for and make any necessary conversions or alterations to your pattern based on your desired final size. Once you have all the math done, you can begin preparing your fabric. 

This is where, if you needed to have a specific color, you would do your dying. After you've completed this, you'll need to undertake a process known as blocking. All blocking does is ensures that the threads in your fabric are as perpendicular as possible. Why is this important? Just about every bit of your cloth will be load-bearing in your finished garment and you want as high a degree of tensile strength as possible in those threads. To do this, tug on your fabric at the opposite corners (also known as pulling along the bias); doing this gives each of the threads a chance to orient themselves. After you've done this, run an iron over all of your fabric to fix the weave in place, then you can begin cutting out the pieces of your pattern on the cross grain (see diagram below). If it seems it bit odd to cut this way, that's probably because it's the exact opposite of what you'd do with just about any other pattern. Cutting along the cross grain prevents the fabric from stretching all that much, which is exactly what we want to  have happen.

This diagram comes courtesy of Grey Cat Quilts
Once you've cut out all your pieces, assemble them according to the instructions of your pattern. This may involve quite a few passes with your sewing machine (first to baste, then to finish your pieces) and the help of an iron. The pieces should begin to resemble the shape of a corset at this point. 

Now it's time to add the waist tape. The tape is usually a grosgrain ribbon that runs horizontally along the inside of the corset approximately halfway between the top and bottom. While it's not at all mandatory to do this step, the waist tape will make your corset more sturdy and elongate its functional life by helping diffuse the tension placed on the highest stress area of the garment. I followed these instructions using this ribbon in solid black. Once the tape is in place your pattern may call for the addition of back facing, or another layer of cloth on the inside of the corset.

Up until this point the focus has been on the fabric (or fabrics, depending on how many layers you want or what your pattern calls for). Now we can turn our attention to the bones. Corset bones come in three basic material types: plastic, reed, and metal (usually steel). For this particular corset, I need the bones to be able to carry some serious stress, so there was no question that steel would be the best choice. Reed and plastic bones are really only good for fashion corsets or bodices, as they can't bear much weight or stress. Steel bones also come in two styles: flat and spiral. While spiral bones are awesome in that they are strong but still allow for a lot of flexibility, I ended up using mostly flat bones since mobility isn't really the goal with this corset. All of the bones and the casings for these bones came from here. Buying pre-made casings can be a bit pricier than making your own, but doing so will drastically cut down on construction time and will effectively remove any guesswork about the strength of your casing fabric.

Before you actually slide the bones into the casings you add your busk if you are using one. Instead of using a normal layout, I made a custom busk using heavy duty lacing bones, some rivets, and these funky brass clasps to give the finished corset more of a steampunk feel. Doing so took quite a while, as each clasp had to be carefully aligned before I could hammer it in place. If you're adding a traditional busk, these instructions provide an excellent guide to doing so.

Take one last set of measurements of the lengths needed for your bones, then trim them if you need to (though you can also buy pre-cut boning). If you do need to trim any bones, you'll almost certainly want to add tips to the ends, as the metal will end up sharp or jagged after being cut and you don't want that poking into you or your fabric. Once your bones are set, you can slide them into the casings and set the latter in place with a stay stitch along both the top and bottom of the corset. 

Almost done! All that's left at this point is finishing the edges of your corset, installing the grommets and adding your lacing. Most corsets are finished with bias tape (which was the case with Attempt #1), but I finished Attempt #2 with strips of heavy faux leather to make it look more steampunk. Then it was a matter of measuring and punching in the grommets along the back, which came together almost exactly the same way as the sleeves on my old Merida costume only I used a little hammer instead of a grommet punch. Once your grommets are all in place, you add your lacing and try it on! The finished product is over there on the right. Best of luck in your costuming adventures!
Read More
Older Posts Home