


Hey guys, hope your holiday season is warm and filled with awesome thus far. Amidst the deluge of games, books, and goodies, there’s also been a bunch going on behind the scenes here at the Care and Feeding of Nerds. Some of these stealthy machinations have to remain secret for now, but other activities can definitely be shared. One of said activities is the measured, but ongoing progress towards the making of Steampunk Hawkgirl.
In just about any other year a costume for Gen Con would already have been benched in favor of whatever was going to be worn for PAX East. There are a few reasons why things will be a bit different in 2015: both of the above mentioned conventions are being held much earlier than would be considered typical (late July and early March, respectively), the stakes have been upped with Hawkgirl as she’ll be part of a group cosplay, and whether I’ll be able to cosplay at all during PAX East remains to be seen (I promise I’ll clarify this last point soon). Given all this, I’m planning on refurbishing one of my existing costumes for PAX if I do end up being able to cosplay during that con.
Without other costumes on the cosplay docket, I was able to tackle a project that I’d always wanted to take on: making a corset from scratch.
<>
Gonna be honest, for a very long time I regarded from-scratch corset making in the same way that I considered making deployable wings. It seemed like such an interesting project that was also fraught with complications and seemed all sorts of intimidating. While I wish I could say something like, “but it’s really not so scary. Anyone can do it!” that wouldn’t be accurate. What I can say is that making a corset is an involved process and, depending on what type of corset you make, can be quite difficult. However, difficult doesn’t at all translate to impossible. With solid preparation and careful execution, making your own custom corset is entirely achievable if you can sew in a straight line.
Before we get down to the nitty gritty of corseting, it would probably help to clarify what types of garments we’re talking about. If you haven’t already, you may want to read this post from a while back that talks about the differences between fashion ‘corsets’, bodices, and fully functional corsets. The construction techniques detailed below could be used to make a fashion corset or bodice by omitting the busk and/or replacing the bones with plastic stays, but I’m writing this tutorial for the express purpose of making a real, self-supporting corset that could be used for a number of functions, including waist training.
The reason I’m insisting on the corset being fully functional is that it’s going to serve as the foundation for the harness that will hold Hawkgirl’s wings. The corset ultimately needs to be able to support my dimensions, the weight of the harness, and the wings themselves. That being said, if you love the idea of a real corset, but are less than excited about the idea of making your own, there are a number of reputable corset dealers online that offer high quality garments or even custom pieces. If you end up purchasing a corset, a basic steel-boned garment will run between $75-$250 USD (custom pieces usually start around $250 USD).
Ok, now that we have the particulars set aside, let’s make a corset! First we have to decide which of the two main varieties of corset we’d like to make: underbust or overbust. These names describe where the neckline or top edge of the front of the corset will end. For this costume, I wanted an underbust corset since those seemed to be more prevalent in the Steampunk genre. Also, underbust corsets are generally a bit easier to put together than their overbust peers because you don’t have to build accommodations for your breasts. Fewer curves to sew = fewer headaches! (most of the time, anyway)
Once we know which type of corset we’ll be building it’s time to select or create a pattern. There’s a wealth of patterns out there on the interwebs, many of which can be downloaded for the low, low price of free. In my first go with corseting I drafted a pattern using these instructions, which are an excellent foundation for most underbust corsets. I loved the pattern and the resulting corset, but it quickly became clear that the garment, while definitely sturdy, would likely have a tough time supporting wings. After some additional googling, I came across the pattern you see below. The fuller, more encompassing design seemed like it stood a very good chance of being up to the wing-wielding task.
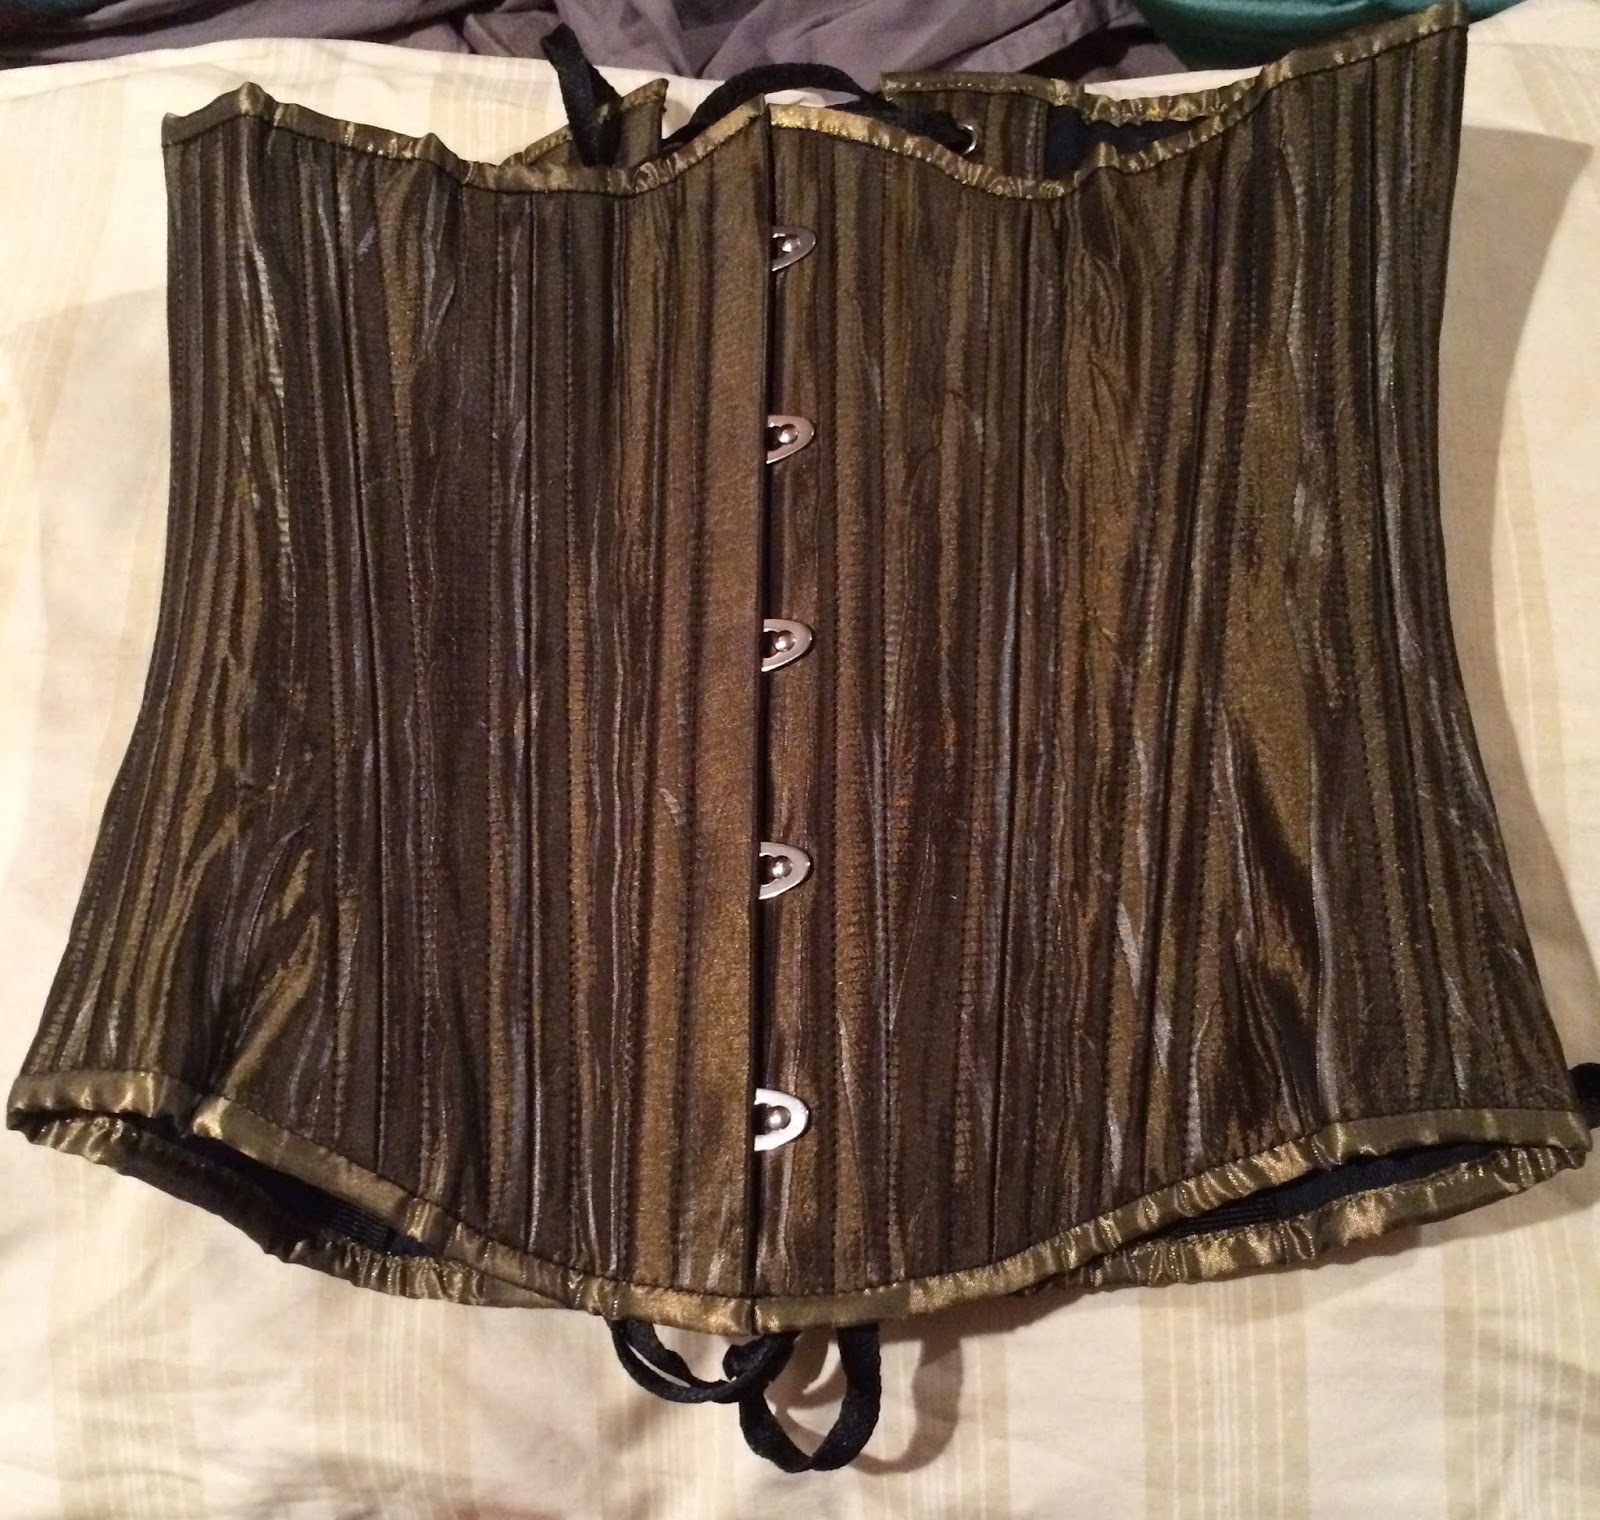 |
| Corset attempt #1 |
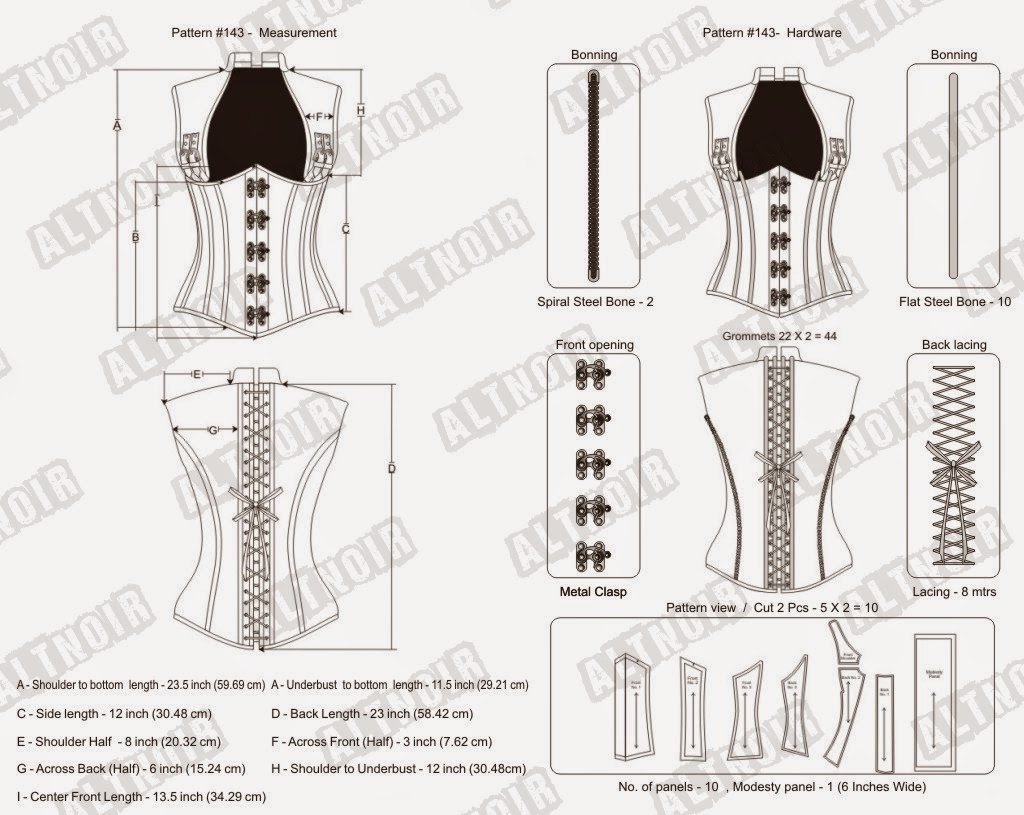 |
| The inspiration for the pattern I used for attempt #2 came via Alt-Noir |
Regardless of the pattern you choose, the basic steps used to assemble a corset are the same. First, gather your materials. All fully functional corsets need the following:
|
Materials
|
Tools
|
|
A solid fabric for the outside of the corset
|
A Sewing Machine
|
|
Coutil, or another strong lining fabric
|
A Grommet Toolset
|
|
Boning, Boning Tips, and Busk
|
A Rotary Cutter & Mat
|
|
Waist Tape
|
Scissors
|
|
Grommets
|
Measuring Tape
|
|
Lacing
|
Small pliers (like those used for chainmail)
|
Using your measuring tape, take the measurements that your pattern calls for and make any necessary conversions or alterations to your pattern based on your desired final size. Once you have all the math done, you can begin preparing your fabric.
This is where, if you needed to have a specific color, you would do your dying. After you've completed this, you'll need to undertake a process known as blocking. All blocking does is ensures that the threads in your fabric are as perpendicular as possible. Why is this important? Just about every bit of your cloth will be load-bearing in your finished garment and you want as high a degree of tensile strength as possible in those threads. To do this, tug on your fabric at the opposite corners (also known as pulling along the bias); doing this gives each of the threads a chance to orient themselves. After you've done this, run an iron over all of your fabric to fix the weave in place, then you can begin cutting out the pieces of your pattern on the cross grain (see diagram below). If it seems it bit odd to cut this way, that's probably because it's the exact opposite of what you'd do with just about any other pattern. Cutting along the cross grain prevents the fabric from stretching all that much, which is exactly what we want to have happen.
Once you've cut out all your pieces, assemble them according to the instructions of your pattern. This may involve quite a few passes with your sewing machine (first to baste, then to finish your pieces) and the help of an iron. The pieces should begin to resemble the shape of a corset at this point.
This is where, if you needed to have a specific color, you would do your dying. After you've completed this, you'll need to undertake a process known as blocking. All blocking does is ensures that the threads in your fabric are as perpendicular as possible. Why is this important? Just about every bit of your cloth will be load-bearing in your finished garment and you want as high a degree of tensile strength as possible in those threads. To do this, tug on your fabric at the opposite corners (also known as pulling along the bias); doing this gives each of the threads a chance to orient themselves. After you've done this, run an iron over all of your fabric to fix the weave in place, then you can begin cutting out the pieces of your pattern on the cross grain (see diagram below). If it seems it bit odd to cut this way, that's probably because it's the exact opposite of what you'd do with just about any other pattern. Cutting along the cross grain prevents the fabric from stretching all that much, which is exactly what we want to have happen.
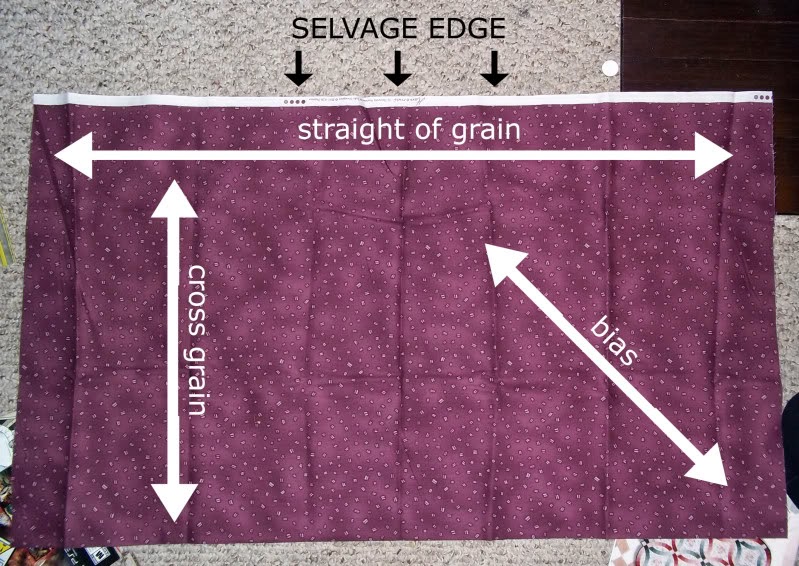 |
| This diagram comes courtesy of Grey Cat Quilts |
Now it's time to add the waist tape. The tape is usually a grosgrain ribbon that runs horizontally along the inside of the corset approximately halfway between the top and bottom. While it's not at all mandatory to do this step, the waist tape will make your corset more sturdy and elongate its functional life by helping diffuse the tension placed on the highest stress area of the garment. I followed these instructions using this ribbon in solid black. Once the tape is in place your pattern may call for the addition of back facing, or another layer of cloth on the inside of the corset.
Up until this point the focus has been on the fabric (or fabrics, depending on how many layers you want or what your pattern calls for). Now we can turn our attention to the bones. Corset bones come in three basic material types: plastic, reed, and metal (usually steel). For this particular corset, I need the bones to be able to carry some serious stress, so there was no question that steel would be the best choice. Reed and plastic bones are really only good for fashion corsets or bodices, as they can't bear much weight or stress. Steel bones also come in two styles: flat and spiral. While spiral bones are awesome in that they are strong but still allow for a lot of flexibility, I ended up using mostly flat bones since mobility isn't really the goal with this corset. All of the bones and the casings for these bones came from here. Buying pre-made casings can be a bit pricier than making your own, but doing so will drastically cut down on construction time and will effectively remove any guesswork about the strength of your casing fabric.
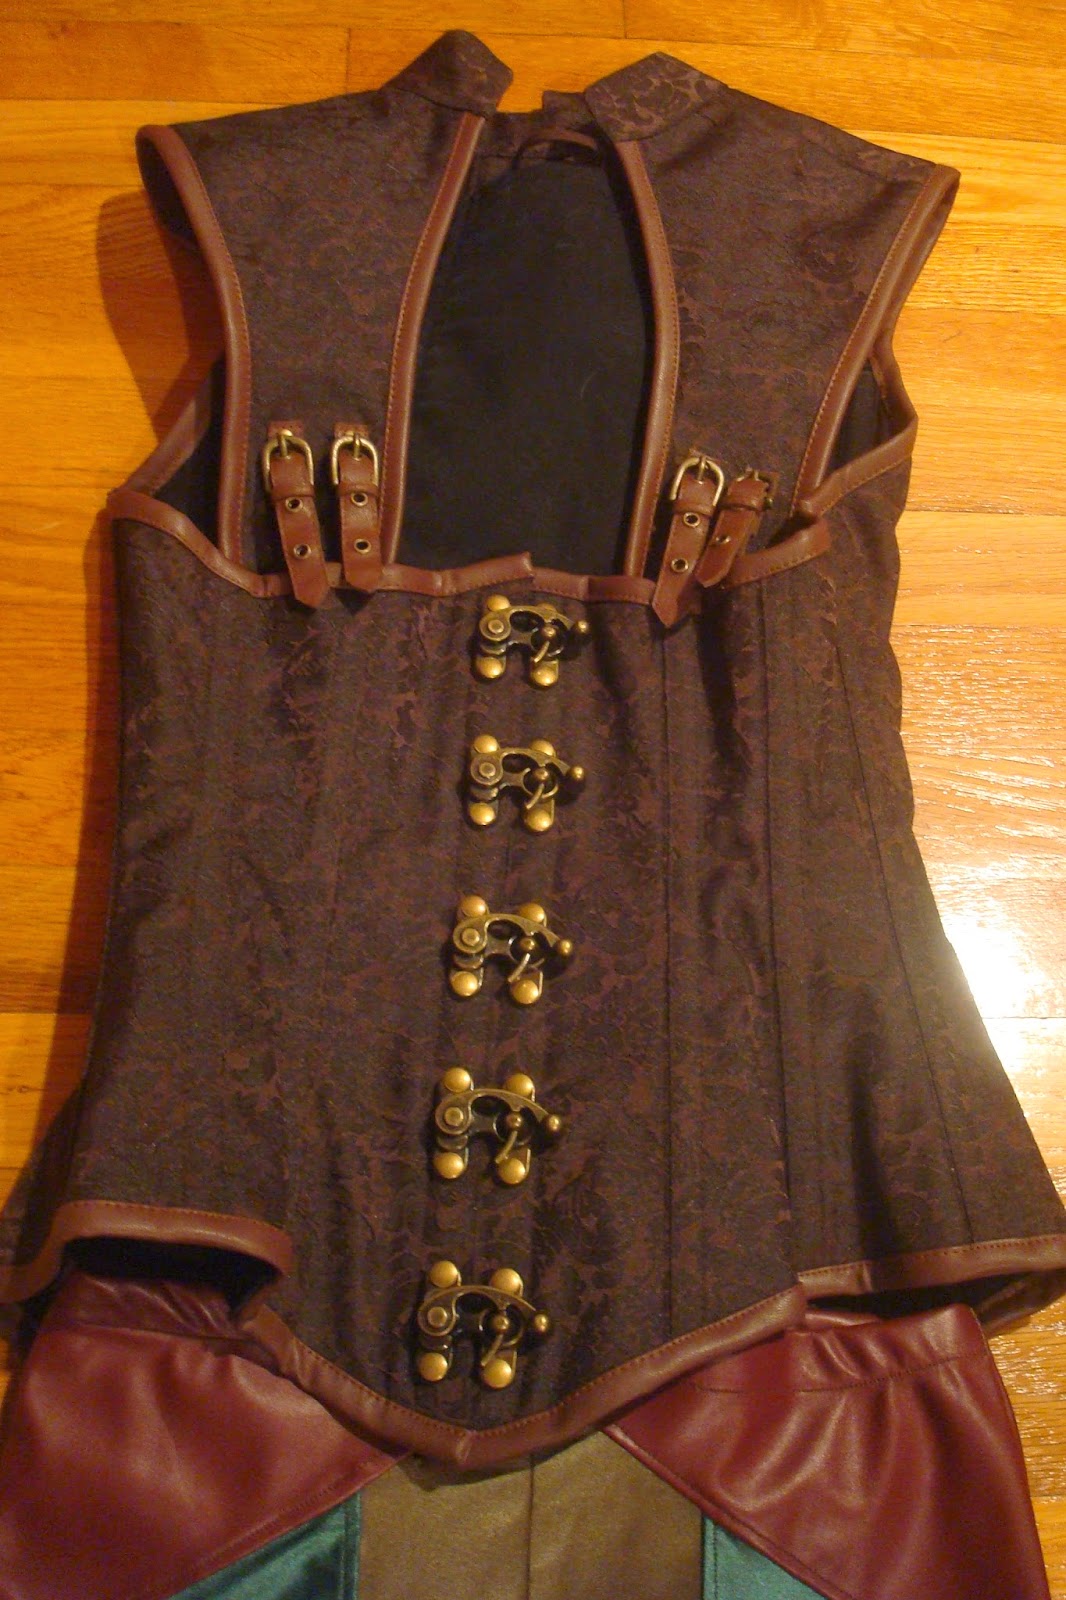
Before you actually slide the bones into the casings you add your busk if you are using one. Instead of using a normal layout, I made a custom busk using heavy duty lacing bones, some rivets, and these funky brass clasps to give the finished corset more of a steampunk feel. Doing so took quite a while, as each clasp had to be carefully aligned before I could hammer it in place. If you're adding a traditional busk, these instructions provide an excellent guide to doing so.
Take one last set of measurements of the lengths needed for your bones, then trim them if you need to (though you can also buy pre-cut boning). If you do need to trim any bones, you'll almost certainly want to add tips to the ends, as the metal will end up sharp or jagged after being cut and you don't want that poking into you or your fabric. Once your bones are set, you can slide them into the casings and set the latter in place with a stay stitch along both the top and bottom of the corset.
Almost done! All that's left at this point is finishing the edges of your corset, installing the grommets and adding your lacing. Most corsets are finished with bias tape (which was the case with Attempt #1), but I finished Attempt #2 with strips of heavy faux leather to make it look more steampunk. Then it was a matter of measuring and punching in the grommets along the back, which came together almost exactly the same way as the sleeves on my old Merida costume only I used a little hammer instead of a grommet punch. Once your grommets are all in place, you add your lacing and try it on! The finished product is over there on the right. Best of luck in your costuming adventures!
No comments :
Post a Comment