Developer Dialogues: Master of Spies

Hey guys. Exactly one week from today I'll be done with the first of the professional certification exams I have slated for this year. While more exams will be forthcoming, there'll be a bit of a break between sitting for the exam and receiving my results, during which I hope to get reacquainted with...well...everything really.

In the meantime, meet the guys behind Move Rate 20 Games, the minds behind the nimble-but-intrinsically-strategic card game, Master of Spies.

Image Credit
Tell us a little about yourselves. What prompted you to want to become game developers?

We’re a group of friends who’ve played various games together for years. We wanted to take our love of gaming to the next level and that was developing our own games. Steve R. brought an idea for a game he had to us, and we agreed to help him develop it -- that game is still being built out. Steve P. showed the group another quick, fun game idea he had, and that eventually became ourfirst Kickstarter, Master of Spies.

Once you decided to put on the developer’s hat, what made you choose this specific type of game? Why did you feel a card-based game was a particularly good fit for your vision of Master of Spies?

Master of Spies was, like many things in life, developed out of frustration. While working on developing our first game idea, which has the working title of “Project Lightning Sword,” Stephen P. got frustrated with some game-mechanic roadblocks. To clear his mind, he sat at the kitchen table with a deck of cards and some poker chips and came up with the rough idea for a simple, quick game that became Master of Spies. We then took that initial idea, tweaked it a bit and decided that it would be a good first release as it had appeal to both hard-core and more casual gamers alike. During the development, we got the idea of tying all of our games together by setting them within the Eldinar universe and thought that using the spy theme would be a fun introduction to the world.

The game is touted as being extremely easy to learn, but a highly satisfying overall play experience. How long would you say it takes people to pick up Master of Spies and what demographics do you think would most enjoy the game?

The basics of the game are very easy to learn, children as young as age nine have gotten the basics in just one play-through. The advanced rules add a bit more strategy, but gameplay remains quick & easy to learn. We believe the game would appeal to families with players of different ages & skill levels since, while being easy to learn, it also has enough strategy to keep the attention of more serious gamers.

The puzzle-based game market is pretty competitive with both major publishers and Indie developers in the field. What would you say makes Master of Spies distinct?

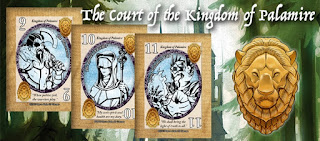
Well, one of the things that make it unique is that it’s based around the world of Eldinar, a unique fantasy world we are creating for the majority of our games. The names of places and characters will appear again and again, taking players deeper and deeper into the intrigue of the world. Plus, there’s the scalable complexity of the game -- we’ve designed it with rules for a “basic” game and a set of Advanced Rules with “Special Actions” that can further a player’s advantage or thwart an opponent.

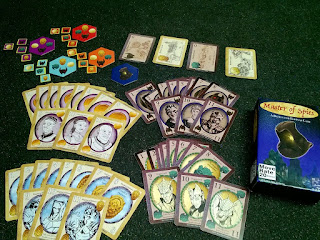
The artwork and overall aesthetic of the game is very interesting. What was your inspiration for the look and feel of the game?

Since the world of Eldinar is a fantasy realm, we wanted the cards to have a look that fit that universe -- cards that feel like they could exist in that world. I wanted something that looked good, was distinctive enough for each Faction, while also being easy to read.

Image Credit
What do you feel was the most enjoyable part of developing Master of Spies and, conversely, what would you say was your biggest challenge?

The most enjoyable part was definitely seeing the reactions of people who play tested the game. They were initially engaged by it, but then got even more into it when they realized it offered more strategy than at first glance. The biggest challenge was finding a balance between simplicity and ease of play vs. depth and strategy, all while keeping gameplay short.

The most fun for me (Stephen P.), as the graphics guy, was designing the cards and bringing the artists onboard to create the portraits of the Royal Courts’ dignitaries.

You intimate on the Kickstarter page that the game would be the first in your Eldinar series, any hints as to what the rest of the series would be like?

The other game currently in development (Project: Lightning Sword) is a more complex resource management, unconventional deck building, and castle defense style card game. There are also plans for a board game and an RPG game setting, both also based in Eldinar.

Is there anything else that you think potential players should know about Master of Spies?

It is quick and fun…easy to learn….good for the family or for your hard-core gaming pals.

Collectively, we have played the game 100’s of times, for play testing, demoing at cons, showing family members during the holidays, etc., and we still enjoy playing. Every game is different because the tactics and styles of the different players combined with the randomness of the cards makes each game session different. Plus with no “player elimination” mechanic, everyone is still in the game and, with a cleverly played card, could potentially pull off a win in the last round.


Interested? The Kickstarter for Master of Spies runs for another two weeks; head over to their page for play footage and even more details!
Read More

NomNoms: Epic Gingerbread (Two Ways)

Say what? A non-This-Week-in-Geekdom post? I'm getting to the point in this not-semester's worth of studying where burnout is beginning to loom large. The brain takes in a tableau of equations for the umpteenth time, turns in on itself and meekly requests, "Could we please just not right now?"

It's been...ehm...a few years since undergrad, but I've found that I revert readily to what had once been tried-and-true study break behavior. This primarily takes the form of baking; it's edible chemistry! It's also a great way to address any and all cravings. In my case, it was the desire for the deep, spice-laden flavor of gingerbread even though the holidays have come and gone. The following recipes both began at one of my favorite online purveyors of make-your-own deliciousness, SmittenKitchen.com, and got a few tweaks partially borne from chemistry and partially due to the availability of ingredients I had on hand. 

Both recipes are a little involved, but yield some seriously bold, fluffy, cakey gingerbread. Bonus: your kitchen will be redolent with awesome for several hours post-baking. 


Difficulty: Medium
Availability of Ingredients: Common
Gadgetry: None
Feeds: 6-10 nerds
Time Till Noms: 60-75 minutes, but at least 30-35 of those minutes are passive while the gingerbread bakes.
Required Equipment: A saucepot, a large glass or other heatproof bowl, a heatproof mixing spoon, measuring cups, measuring spoons, a large glass or metal baking pan.
Optional Equipment: A spice grater, a sifter

Ingredients
1 cup of water
1.5 teaspoons of baking soda
8 Tablespoons of unsalted butter, plus a few more if you're using them to grease your pans.
2/3 cup of brown sugar 
1 cup unsulfured molasses (not blackstrap)
2.5 cups flour, plus a little more if you're using it to flour your pans
2 large eggs brought to room temperature
2 teaspoons ground ginger
1.5 teaspoons ground cinnamon
0.5 teaspoons ground cloves
0.5 teaspoons ground nutmeg 
0.5 teaspoons of salt
2 teaspoons baking powder
A small quantity of confectioner's sugar for dusting over the finished bread
Parchment paper or cooking spray
1 Tablespoon of freshly ground ginger (optional)

*heat your oven to 350 degrees (176.67 Celsius) 

Step 1) Line your baking dish with parchment paper, then butter and flour the dish. Alternatively, you can coat it liberally with your cooking spray. If you're using spray, you may want to give the measuring cup that will be holding the molasses a spritz, as this will help release all of the sticky goodness later. Cut the remaining butter into small chunks and, if you haven't already, bring your eggs out so they can come up to room temperature.

Step 2) In your saucepot, bring the water to a rapid boil, then add your baking soda. This will produce a fun fizzy/foamy reaction for a few seconds. Woo, chemistry! Remove the water/soda mixture from the heat source and leave it to stand for five minutes.


Step 3) Once your soda-water has settled, add your butter into the mix and swirl everything together until the butter has completely melted. From here, add the brown sugar and molasses and stir until you have a nice, homogeneous mixture. If you're using fresh ginger, now would be the time to grate that over your saucepan and incorporate that into the mixture.


Step 4) Add the following to your heatproof bowl: the flour, baking powder, salt, cinnamon, cloves, ground ginger, and nutmeg. If you have a sifter and want to get fancy, you can sift these together or, if you're really into not doing dishes and your saucepan is large enough, you can sift these directly into the saucepan. If your saucepan isn't quite big enough, pour the contents of it onto the dry ingredients in your heatproof bowl and stir until until everything is uniform.


Step 5) If the resulting mixture feels hot to the touch, let it cool for 10-15 minutes. If it doesn't, add your eggs and give everything one last good stir to ensure homogeneity.

Step 6: Pour your batter into your baking dish, then bake for 30-35 minutes. Once the gingerbread has finished its sojourn into the oven, let it cool completely. If you'd like, you can sprinkle some confectioner's sugar over the top once the gingerbread is cool to the touch. Yay!


Difficulty: Hard
Availability of Ingredients: Somewhat Common
Gadgetry: None
Feeds: 6-10 nerds
Time Till Noms: 70-85 minutes, but up to 50 of these minutes are passive as the gingerbread bakes.
Required Equipment: A saucepot, a large glass or other heatproof bowl, another mixing bowl, a heatproof mixing spoon, a whisk, measuring cups, measuring spoons, a glass or metal baking dish.
Optional Equipment: A bundt pan, a spice grater, a sifter

Ingredients

1 cup of Irish dry stout or oatmeal stout (I used Guinness stout and it worked very well)
0.5 teaspoons of baking soda
1 cup brown sugar 
1 cup granulated sugar
1 cup of unsulfured molasses (not blackstrap)
2 cups flour
1.5 teaspoons of baking powder
2 Tablespoons of ground ginger
1 teaspoon of ground cinnamon
0.25 teaspoon ground cloves
0.25 teaspoon ground or freshly grated nutmeg
a pinch of ground cardamom
3 large eggs, brought to room temperature
0.75 cups of vegetable, canola, or safflower oil
Parchment paper or cooking spray
A small amount of confectioner's sugar for dusting over the finished bread

*heat your oven to 350 degrees (176.67 Celsius) 

Step 1) Line your baking dish with parchment paper, then butter and flour the dish. Alternatively, you can coat it liberally with your cooking spray. If you're using spray, you may want to give the measuring cup that will be holding the molasses a spritz, as this will help release all of the sticky goodness later. **Note: if you're trying to make this in a bundt pan, be especially liberal with the buttering/flouring. This batter ends up extremely sticky.**

Step 2) In your saucepan, combine your molasses and stout, then bring that mixture to a boil. Once it's boiling, add your baking soda, stir, and remove the whole shebang from your heat source.

Step 3) Add to your heatproof bowl the flour, baking powder, ginger, cinnamon, cloves, nutmeg, and cardamom. Stir these gently to combine.

Step 4) Add the three eggs and both types of sugar to your other mixing bowl. Whisk these together, then add your oil and whisk that into the mix as well. 

Step 5) Give the molasses and stout mixture a quick feel test. If it's close to room temperature (or at least isn't hot), then add the contents to the bowl with the eggs/sugar mixture and stir everything together. Once you have a homogeneous blend, toss that in with the flour and spices. Stir the whole shebang together until everything is uniformly combined. 

Step 6) Pour the resulting batter into your pan and give the pan a few sharp raps on your countertop to eliminate any air bubbles that may have formed. Place the pan in the oven and bake for 30-40 minutes if you're using a rectangular baking dish and 50 minutes if you're using a bundt pan.

Step 7) Once the gingerbread has finished its sojourn into the oven, let it cool completely. Sprinkle some confectioner's sugar over the top once the gingerbread is cool to the touch. Yay!


FAQs

Does it matter what type of brown sugar I use?

Not really. Dark brown sugar tends to jive a little better with the ingredients in these recipes, but there's no real reason why you couldn't use light brown sugar. Just ensure that it's brown sugar you're using and not, say, cane or some other form of raw sugar.

Why shouldn't I use blackstrap molasses?

Honestly you could, but your gingerbread would turn out with an extremely intense, somewhat bitter flavor that would likely be overwhelming for most palettes. If you like your gingerbread to be incredibly bold and on the less sweet side, then go right ahead and use blackstrap.

What's with the boiling of liquids? Can I just skip that step and add those ingredients directly to the others?

This step is what gives the gingerbread its fluffy, cakey texture. If you skip it the results will be quite different than if you hadn't.


Best of luck on your kitchen experimentations!


Read More
Newer Posts Older Posts Home